Automatized analysis on Github push
In this article we will show main principles to allow run an analysis on your objectscriptQuality server each time you push any change to your Github repository. For simplicity, we will configure open source repositories.
Although we have shown a sample configuration for Github projects, a very similar approach can be taken for private repositories.
Github workflow
Github provides a mechanism to raise actions when code changes on the repository. This is done using YAML files on the .github/workflows folder in your project.
The YAML file is quite simple:
name: objectscriptquality
on: push

jobs:
  linux:
    name: Linux build
    runs-on: ubuntu-latest

    steps:
    - name: Execute objectscriptQuality Analysis
      env:
        JENKINS_OBJECTSCRIPTQUALITY_URL: https://myjenkins.domain.com
        JENKINS_OBJECTSCRIPTQUALITY_USER: my-jenkins-hook
        JENKINS_OBJECTSCRIPTQUALITY_PASSWORD: ${{ secrets.jenkinsPass }}
        JENKINS_OBJECTSCRIPTQUALITY_TRIGGER_ACCESS_TOKEN: ${{ secrets.jobToken }}
        BRANCH_TO_ANALYZE: master
      run: wget https://raw.githubusercontent.com/litesolutions/objectscriptquality-jenkins-integration/master/base-hook.sh && sh ./base-hook.sh
Here we are defining the steps to execute on push, which are basically:
- Define environment variables:
- Your Jenkins URL
- Your Jenkins user
- Your Jenkins password
- Your Jenkins job token
- The branch you want to be analyzed
- Download and execute the script that will do the job
We will consider later the environment variables.
The base-hook.sh is a bash script with the logic we want to execute on push. That bash will receive the environment variables and will request Jenkins to run the analysis job. It also creates the analysis job if it does not exists yet.
#!/bin/bash

JENKINS_URL=$JENKINS_OBJECTSCRIPTQUALITY_URL
JENKINS_USER=$JENKINS_OBJECTSCRIPTQUALITY_USER
JENKINS_PASSWORD=$JENKINS_OBJECTSCRIPTQUALITY_PASSWORD
JOB_BUILD_TRIGGER_ACCESS_TOKEN=$JENKINS_OBJECTSCRIPTQUALITY_TRIGGER_ACCESS_TOKEN
JOB_GENERATOR=job_generator
TARGET_FOLDER=
GIT_URL=https://github.com/$GITHUB_REPOSITORY
BRANCH=$BRANCH_TO_ANALYZE
COOKIE_JAR=/tmp/cookies

JENKINS_CRUMB=$(curl --silent --cookie-jar $COOKIE_JAR -s -u $JENKINS_USER:$JENKINS_PASSWORD $JENKINS_URL'/crumbIssuer/api/json' | sed -E 's/.*"crumb":"?([^,"]*)"?.*/\1/')
echo "Jenkins crumb: "$JENKINS_CRUMB
JOB_DISPLAY_NAME=${GIT_URL##*/}
JOB_NAME_TO_CALL=$JOB_DISPLAY_NAME
echo "Job name to call: "$JOB_NAME_TO_CALL

JENKINS_JOB_URL=
if [ -z "$TARGET_FOLDER" ]
then
    JENKINS_JOB_URL=$JENKINS_URL'/job/'$JOB_NAME_TO_CALL
else
    JENKINS_JOB_URL=$JENKINS_URL'/job/'$TARGET_FOLDER'/job/'$JOB_NAME_TO_CALL
fi

EXISTING_JOB_NAME=$(curl $JENKINS_JOB_URL'/api/json' -u $JENKINS_USER:$JENKINS_PASSWORD | sed -E 's/.*"name":"?([^,"]*)"?.*/\1/')
echo "Name of existing job: "$EXISTING_JOB_NAME

## Job generation
## Remove this block if you don't want to generate jobs dynamically
if [ "$EXISTING_JOB_NAME" != "$JOB_NAME_TO_CALL" ]
then
    echo "Job does not exists"

    # We keep all our jobs generators in a folder name 'job_generator'
    # Adapt to your own path
    curl -G -I --cookie $COOKIE_JAR $JENKINS_URL'/job/job_generator/job/'$JOB_GENERATOR'/buildWithParameters?token='$JOB_BUILD_TRIGGER_ACCESS_TOKEN \
               --data-urlencode 'GIT_URL='$GIT_URL \
               --data-urlencode 'BRANCH='$BRANCH \
               -H "Content-Type:text/xml" \
               -u $JENKINS_USER:$JENKINS_PASSWORD -v

    # Wait 2 minutes to allow Jenkins to have the job ready,
    # so build can be invoked forward
    sleep 120

    echo "Job '"$JOB_NAME_TO_CALL"' created!"
fi
## END - Job generation

echo "Invoke "$JOB_NAME_TO_CALL
curl -X POST -s --cookie $COOKIE_JAR $JENKINS_JOB_URL'/build' -H 'Jenkins-Crumb:'$JENKINS_CRUMB -u $JENKINS_USER:$JENKINS_PASSWORD -v
echo "Job '"$JOB_NAME_TO_CALL"' Executed!"
The important parts in that script that you need to customize are following variables:
- The JOB_GENERATOR is the name of the job in Jenkins with capabilites to generate another jobs.
- The TARGET_FOLDER is the folder name where you want to create and execute your jobs. If you don't use folders, just leave blank or remove it.
- The BRANCH indicates the branch to analyze.
The Job Generator script
If we don't want to be aware of jobs generation, we need some job to do it for us.
We have built a parametrized bash script to create a new job in Jenkins:
# Set variables
TARGET_FOLDER=
JOB_DISPLAY_NAME=${GIT_URL##*/}

# Replace values from template
cp job-template.xml /tmp
sed -i -e 's|{{GIT_URL}}|'"$GIT_URL"'|' /tmp/job-template.xml
sed -i -e 's|{{BRANCH}}|'"$BRANCH"'|' /tmp/job-template.xml
sed -i -e 's|{{DISPLAY_NAME}}|'"$JOB_DISPLAY_NAME"'|' /tmp/job-template.xml

cat /tmp/job-template.xml

# Generate job
export COOKIE_JAR=/tmp/cookies

JENKINS_CRUMB=$(curl --silent --cookie-jar $COOKIE_JAR -s -u $JENKINS_USER:$JENKINS_PASSWORD $JENKINS_URL'/crumbIssuer/api/json' | sed -E 's/.*"crumb":"?([^,"]*)"?.*/\1/')
JOB_NAME_TO_GENERATE=$JOB_DISPLAY_NAME

JENKINS_JOB_URL=$JENKINS_URL'/job'
if [ -z "$TARGET_FOLDER" ]
then
    JENKINS_JOB_URL=$JENKINS_URL'/job/'$TARGET_FOLDER
fi

curl -s --cookie $COOKIE_JAR $JENKINS_JOB_URL'/createItem?name='$JOB_NAME_TO_GENERATE \
     -H 'Jenkins-Crumb:'$JENKINS_CRUMB \
     -H "Content-Type:text/xml" \
     -u $JENKINS_USER:$JENKINS_PASSWORD
     --data-binary @/tmp/job-template.xml
rm /tmp/job-template.xml
File job-generator.sh replaces variables on job-generator.xml and invokes the creation for the new job using such XML.
The job-generator.xml has all the necessary configuration to create a new job that will run objectscript analysis. If you need another configuration you will need to create your own XML for your setup.
You can find the sources on following repository:
https://github.com/litesolutions/objectscriptquality-jenkins-job-generator
Job Generator on Jenkins
Now let's see how to configure the job in Jenkins that will manage the creation of your new projects jobs using the script shown previously.
First step is to create a job that we will name job_generator. You can user the name you want but we recommend to avoid spaces and special characters.
On job configuration do your job description and configure old builds cleanup.

Next step is to define the parameters we will need to execute the actions to create a new job and analyze existing ones.

Notice that JENKINS_USER and JENKINS_PASSWORD must be the credentials of a user with capabilities to create jobs and to run them.
The GIT_URL and BRANCH are ovewritten on the request in base-hook.sh.
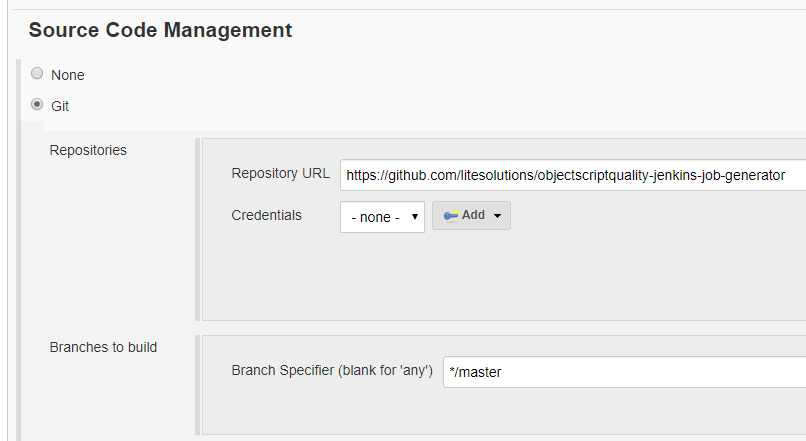
We strongly recomment you have your job generator stored in a source code management repository; in our case we are using Github but you can use your favourite one. So, configure the source code management repository with your job generator repository.
Now we will need to set the authentication trigger to allow remote executions of the job. You can generate it with random generator keys like RandomKeygen or Online UUID Generator. Only users with that token will be available to run your job, so take care of it.

This is the token we defined for variable JENKINS_OBJECTSCRIPTQUALITY_TRIGGER_ACCESS_TOKEN on the initial YAML configuration.
And finally call the bash script dowloaded from the repository. Or if you prefer, you can have your custom local bash script. Remember you also need the XML file in case you start from a copy of our guide.

Jenkins user for remote execution
To run the jobs remotely you must create a user with very strict permissions to avoid undesired operations on your Jenkins jobs.
Before start, be sure you have already installed the plugin Role-base Authorization Strategy. If not, do it now before continue.
On Manage Jenkins > Configure Global Security ensure you have selected Role-Based Strategy for Authorization.

On Manage Jenkins > Manage Users create a new user.

This user is the one we defined for variable JENKINS_OBJECTSCRIPTQUALITY_USER on the initial YAML configuration. So its passwords is the one to set to JENKINS_OBJECTSCRIPTQUALITY_PASSWORD.
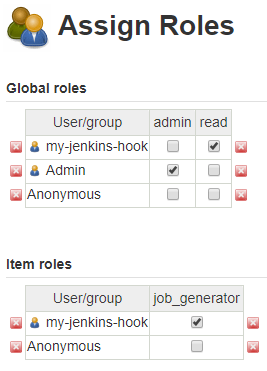
On Manage Jenkins > Manage and Assign Roles > Manage Roles create a new role named read that only have the overall read permissions.

On the same place, create a item role for the Job Generator and ensure to have minimal permissions for execution, as shown in the following image.

The item role pattern is a regular expression that must accomplish the items for which this permissions will override global permissions.
On Manage Jenkins > Manage and Assign Roles > Assign Roles apply restrictions to your remote user.
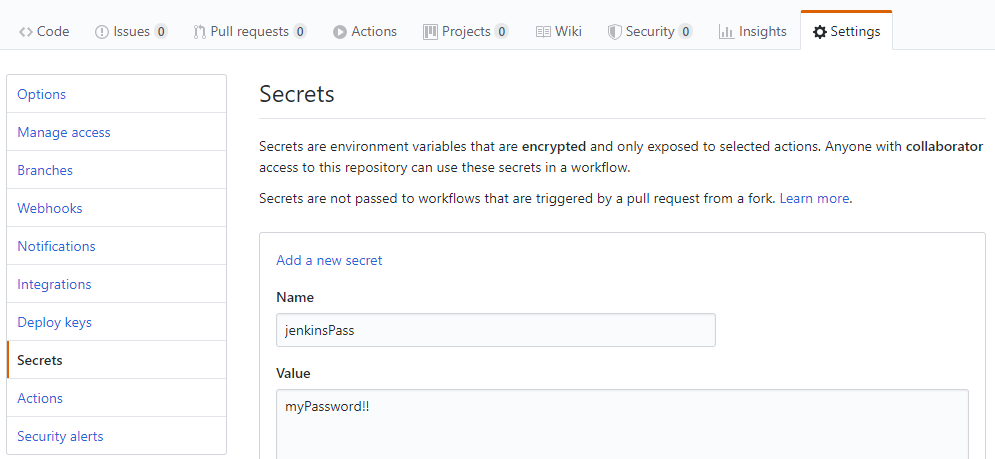
Keep secrets on Github
On the Github workflow YAML we defined 2 secrets :
- jenkinsPass, to be used on variable JENKINS_OBJECTSCRIPTQUALITY_PASSWORD
- jobToken, to be used on variable JENKINS_OBJECTSCRIPTQUALITY_TRIGGER_ACCESS_TOKEN
The jenkinsPass is the one we have create for the user with capabilities to run remote jobs (check above).
The jobToken is the token we have during Job Generator on Jenkins and it is required to create new jobs.
To be able to use those secrets, they must be defined on the project settings, like shown on the following image:
After both secrets are added, it should look like this:
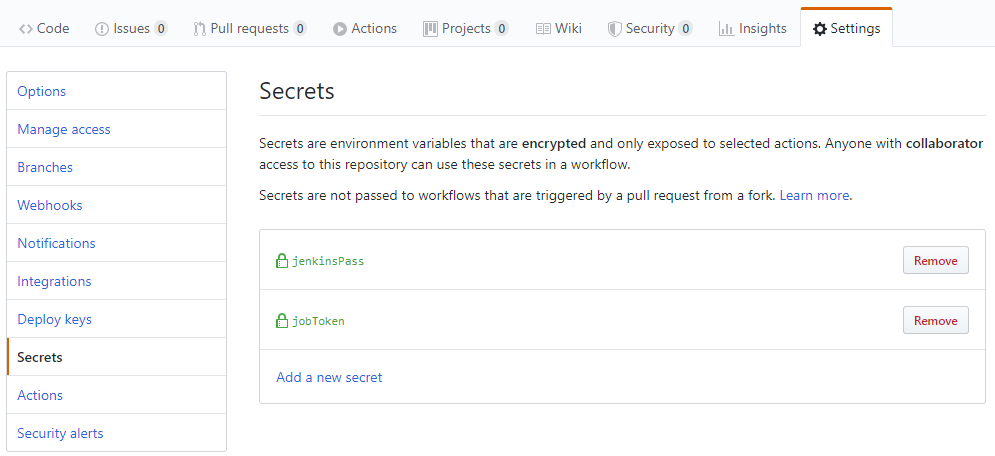
Now your secrets will be replaced in a secure way.
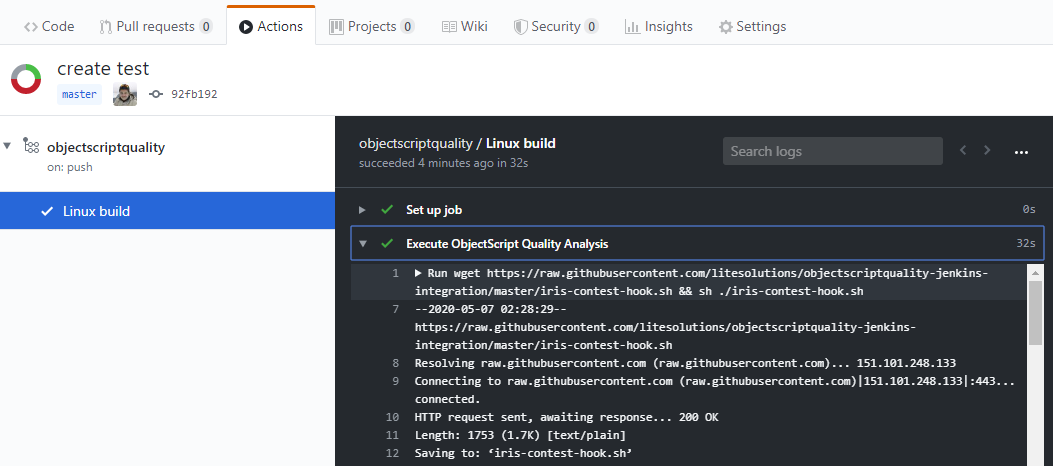
Check execution on Github
On the Actions tab you can view the workflow file information executed after each push.

If you select the name of your YAML job, you can explore the execution of it.
Limitations
This procedure is thought for small projects that can be run very frequently without generating any problem on the server used for analyzing the code.
If you are running huge projects, a different approach would be to make a queue with projects that has been pushed. Then, once or twice a day, a job checks all the projects to analyze in the list and runs all them.
Conclusions
Once your first configuration is running, adding a simple YAML file to your project it will always analyzed to have constant feedback about problems in your code. If you have dozens or hundreds of projects, it will help on the analysis management and your developers will stand always with enough information about their work.