Proxy Jenkins and SonarQube
Following steps will show how to configure a proxy server to browse two different domains, one for SonarQube and the other one for Jenkins, sharing the secure port 443.
Here we show how to configure IIS as a reverse proxy for SonarQube and Jenkins. Don't follow next steps if you have other preferred application server to use as proxy.
1. Configure IIS requeriments
The following instructions have been created for a Windows Server 2016, and can differ for another Windows operating system.
1.1 Visit Microsoft Web Platform Installer page and download the application to your Downloads folder
1.2 Install the downloaded file
Before installing the Application Request Routing, be sure the ISS version is 7 or higher.
If IIS version is 10.0 or higher, follow next steps
A. Open Registry Editor panel
B. Search for HKEY_LOCAL_MACHINE\SOFTWARE\Microsoft\InetStp
C. Edit MajorVersion value and set decimal value to 7 (and remember the previous version that was set to undo this action later)
1.3 Open the Web Platform Installer and type arr on the search box and press enter
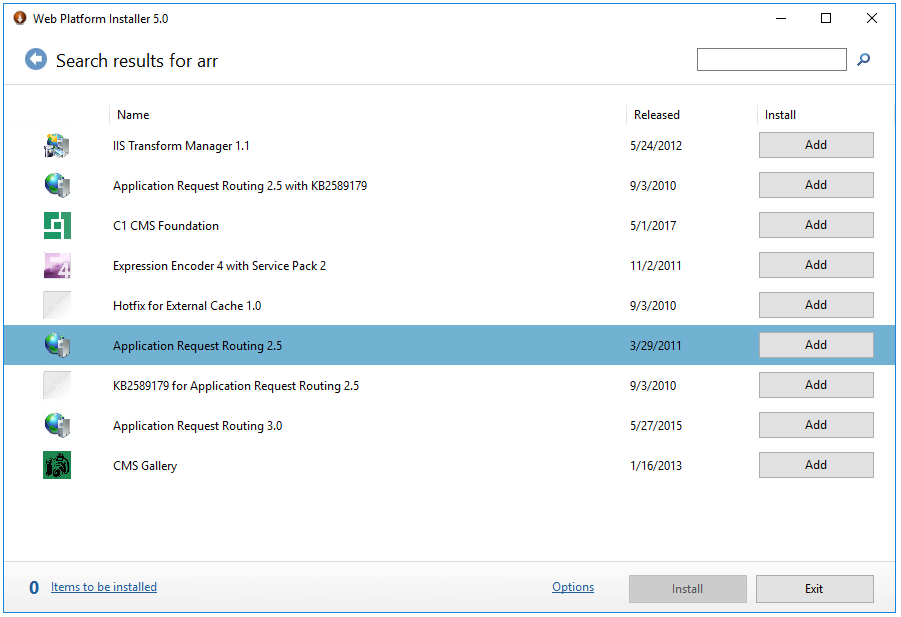
1.4 Add Application Request Routing application
1.5 Now search for url rewrite and Add the URL Rewrite application
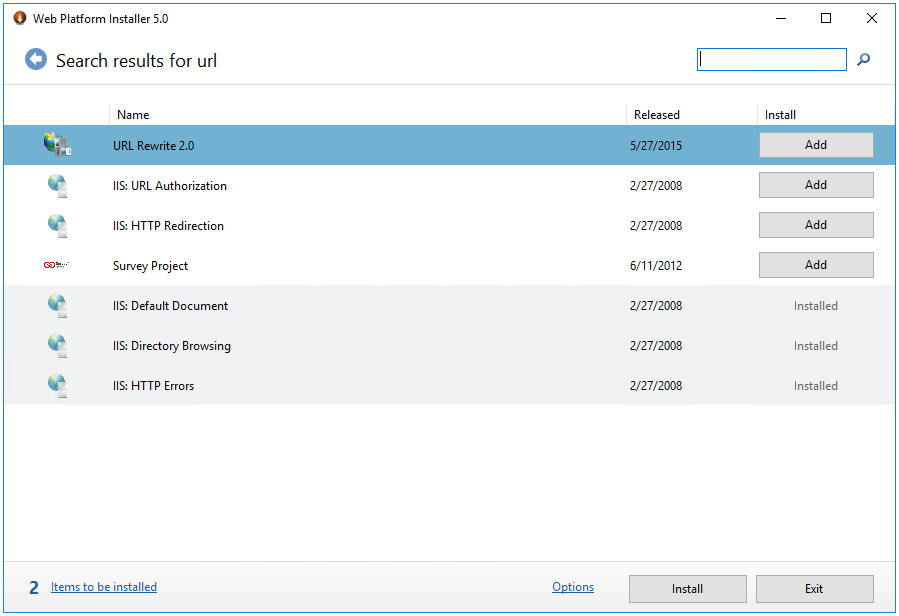
1.6 Click on Install button and Accept license terms to install the applications
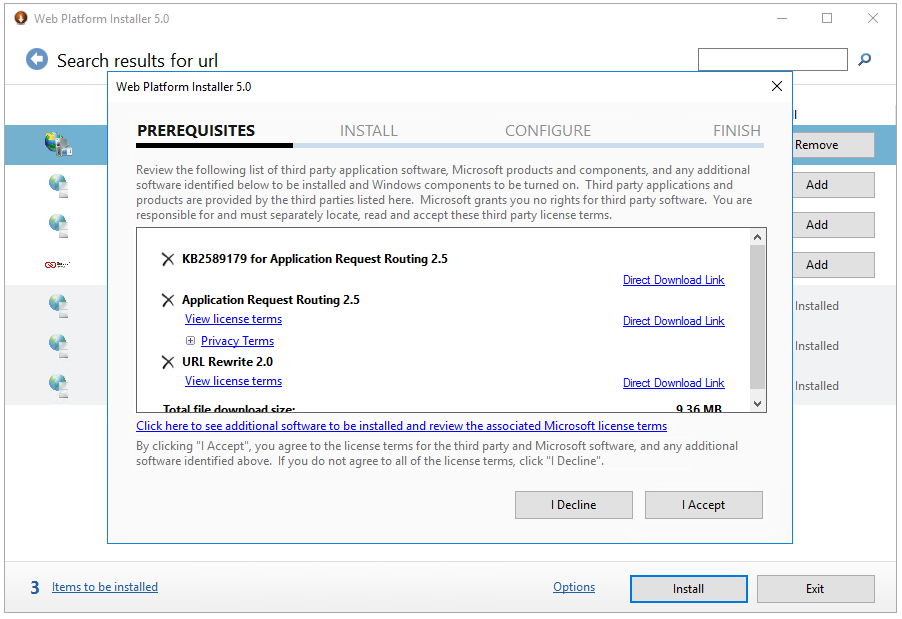
If you needed to change IIS version to install ARR, then set the original version
2. Enable proxy
2.1 Select your server, then double click on Application Request Routing
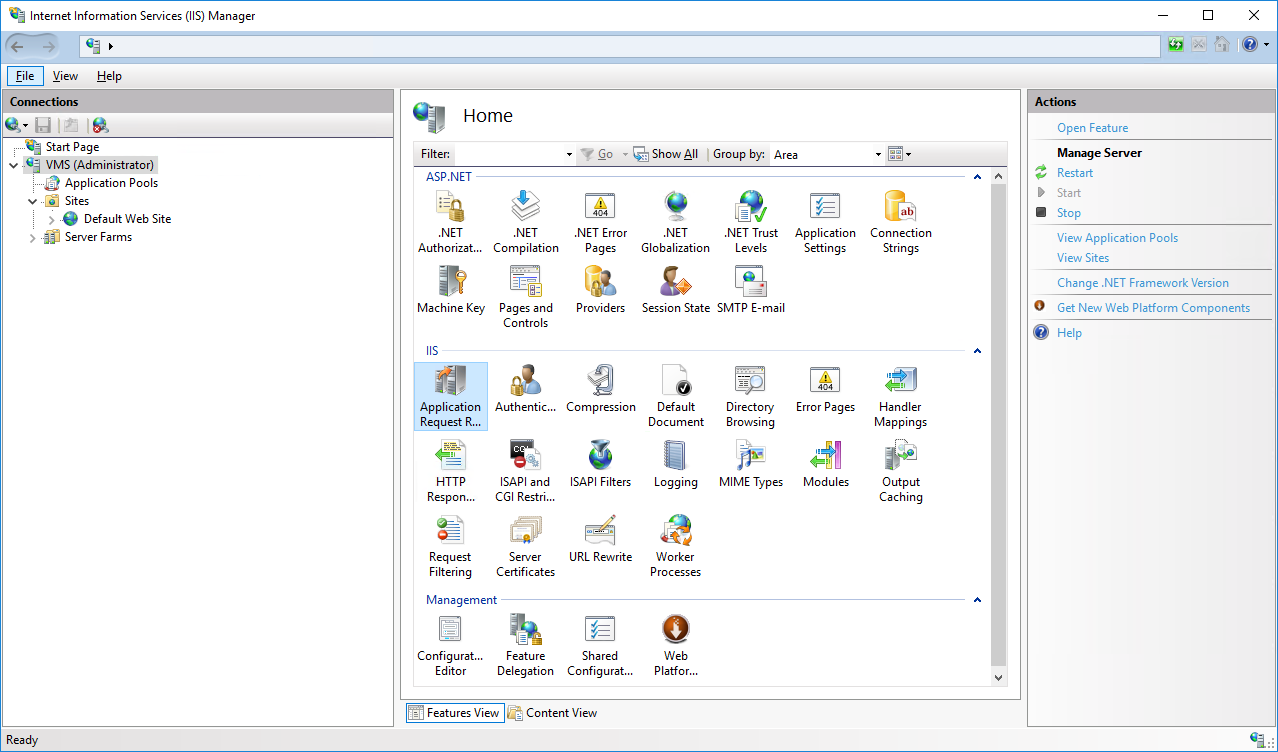
2.2 Open Server Proxy Settings and click on Enable proxy and enable Reverse rewrite host in response headers

2.3 Click on Enable proxy and enable Reverse rewrite host in response headers to allow the login on the SonarQube website
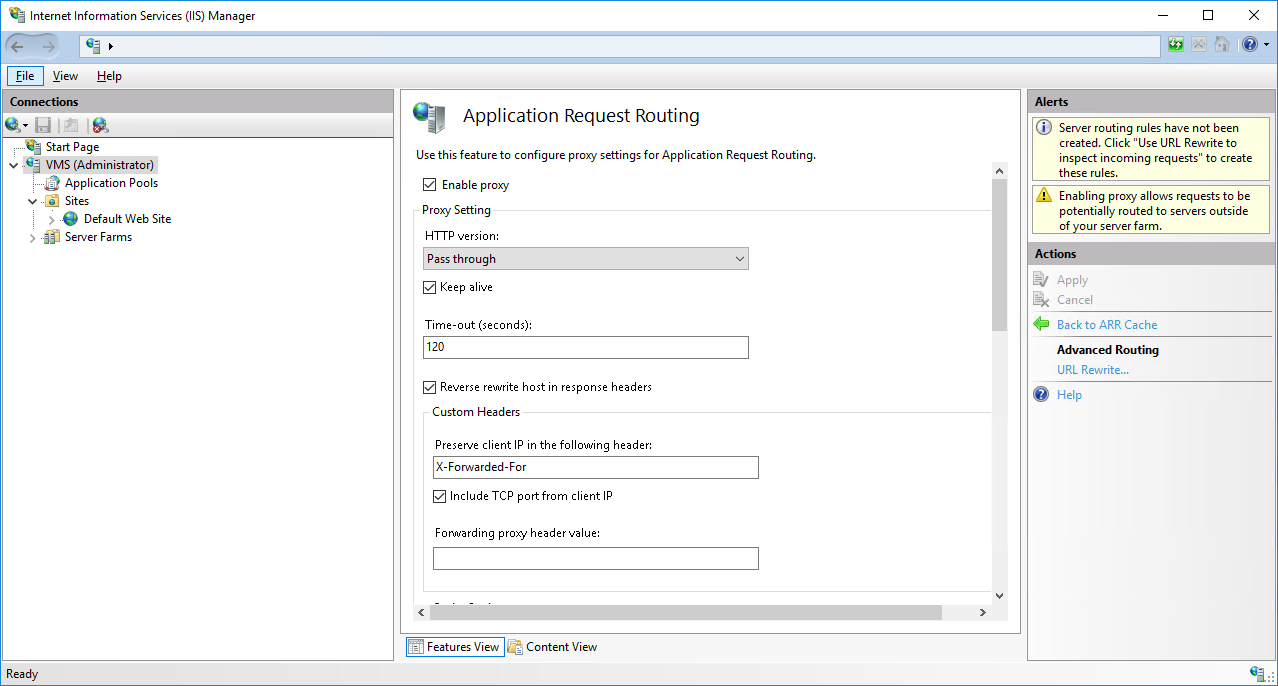
2.4 Click on Back to ARR Cache and save the changes
3. Create SonarQube website
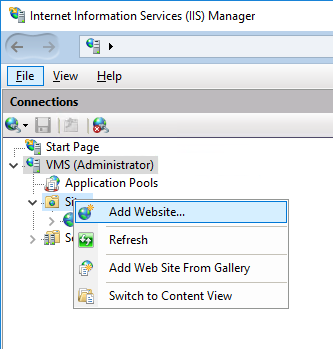
3.1 Create a new website on your IIS installation
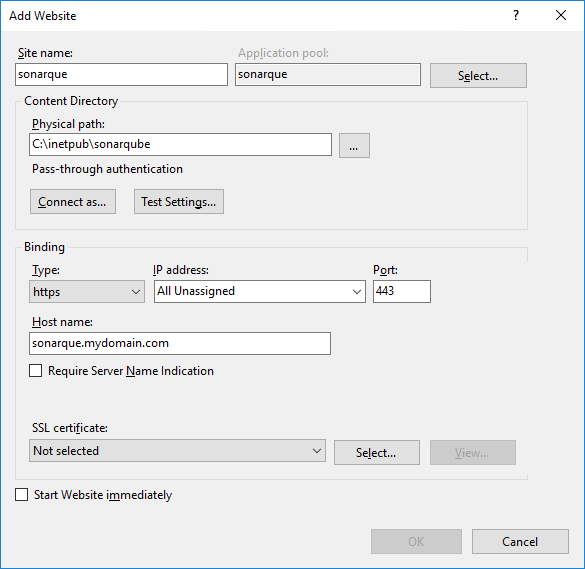
3.2 Set the Site name and Host name, and select your preferred binding type (we recommend to choose https); also, uncheck Start Website immediately to avoid start the site before finishing the configuration
4. URL Rewrite for SonarQube
4.1 Select your website, then double click on URL Rewrite
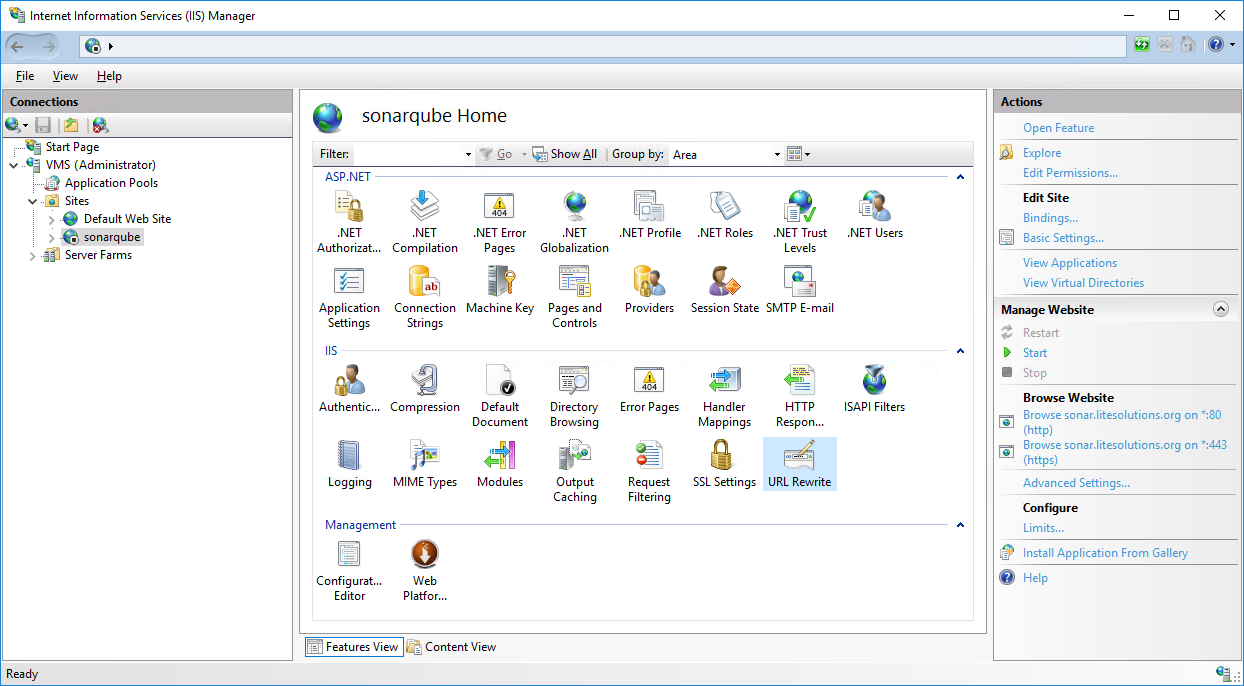
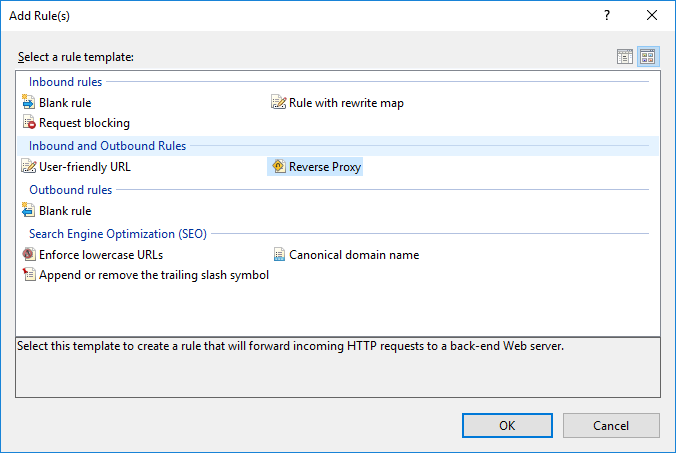
4.2 Click on Add Rule(s) ... and select Reverse Proxy in the opened dialog
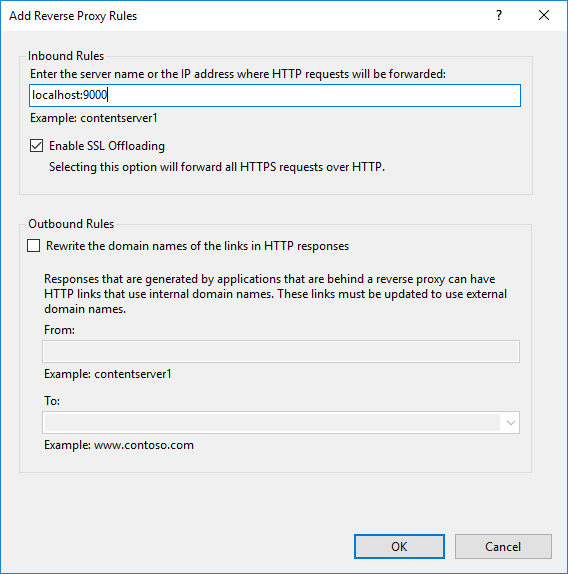
4.3 Set the SonarQube domain and port in the inbound rules; in our example, it is located on localhost:9000
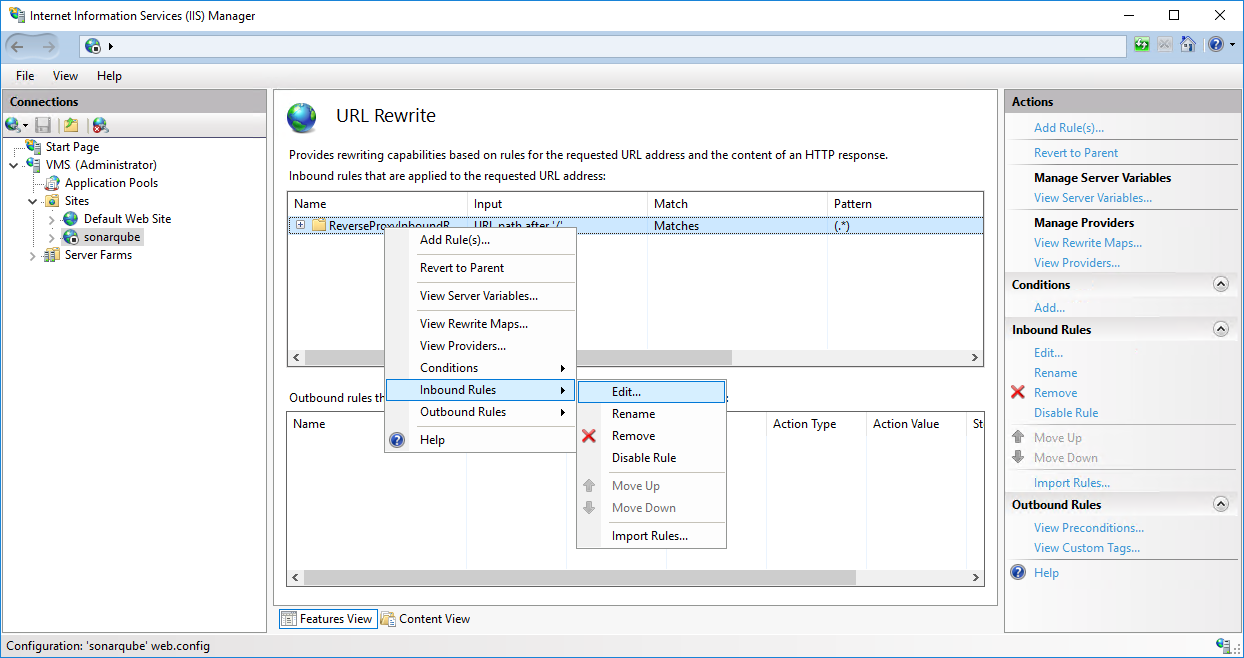
4.4 To check the rule, from the URL Rewrite module edit the Inbound Rules
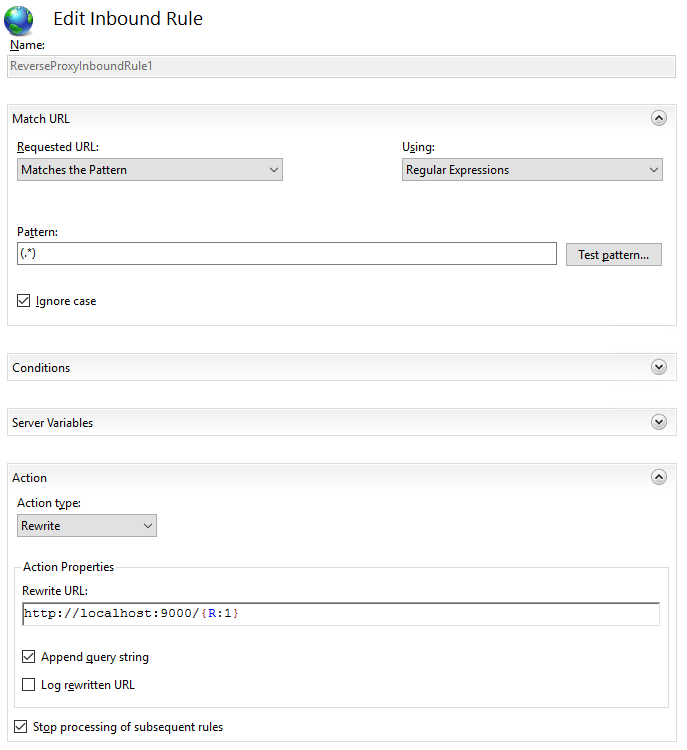
4.5 Check the Rewrite URL at the bottom of the panel
5. Start sonarqube website
5.1 Select Manage Website > Start on the contextual menu of your SonarQube website
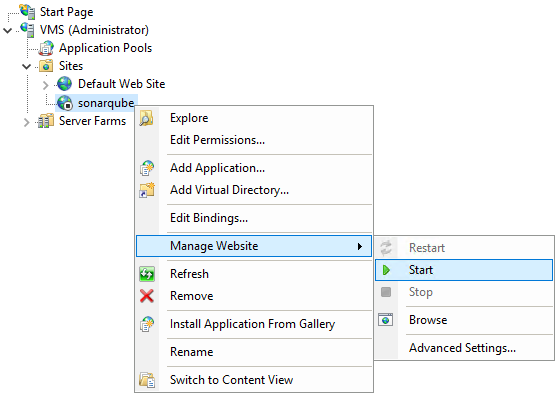
5.2 Check on your browser using the defined URL. In our example:
https://sonarqube.mydomain.com
6. Create Jenkins website
Follow the same steps as for creating the SonarQube website
7. URL Rewrite for Jenkins
7.1 Follow the same steps as for creating the SonarQube URL Rewrite rules
7.2 Check the Rewrite URL at the bottom of the panel
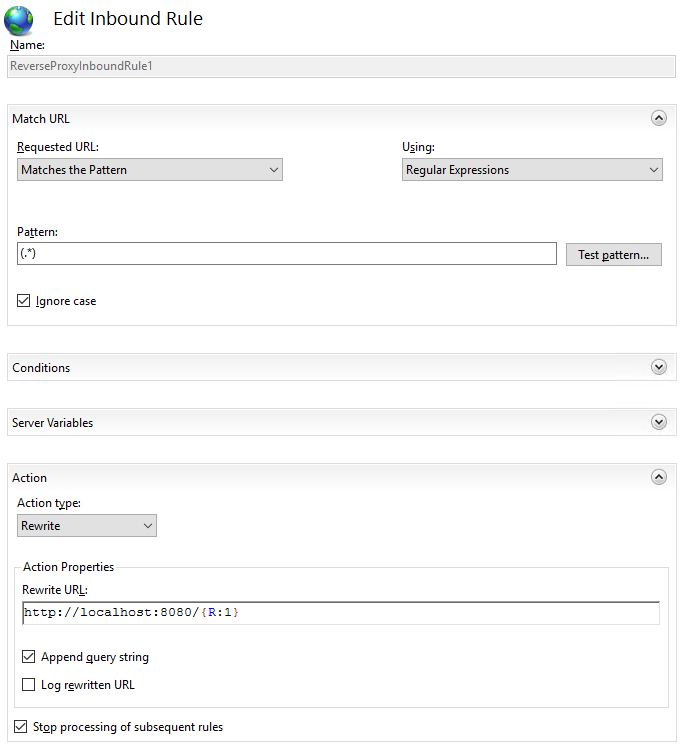
8. Start jenkins website
8.1 Select Manage Website > Start on the contextual menu of your Jenkins website
8.2 Check on your browser using the defined URL. In our example:
https://jenkins.mydomain.com
1. Install Apache2
1.1 Use your Linux distribution to install Apache2.
$ sudo aptitude install apache2
1.2 Install the proxy module for Apache2.
$ sudo aptitude install -y libapache2-mod-proxy-html libxml2-dev
1.3 Enable the Apache2 modules to work as a proxy.
$ sudo a2enmod ssl proxy proxy_ajp proxy_http rewrite deflate headers proxy_balancer proxy_connect proxy_html
2. Securize the server: close ports
You need only 80 and 443 ports opened. Close any other port that you are not using to avoid security concerns.
We leave port 80 opened to allow redirection to the secure port if someone try to access
3. Securize the server: use HTTPS
3.1 Deploy your certificates on /opt/local-certs. You will need the public key (.crt file), the private key (.key file) and your certificate chain as a bundle (.crt file).
3.2 If you don't have a bundle but you have the certificates of your chain, you can create just concatenating them, as follows:
$ cat /opt/local-certs/COMODORSADomainValidationSecureServerCA.crt /opt/local-certs/COMODORSAAddTrustCA.crt /opt/local-certs/AddTrustExternalCARoot.crt >> /opt/local-certs/mydomain.crt-bundle
3.3 Setup the default Apache2 configuration as follows:
<VirtualHost *:80>
  RewriteEngine On
  RewriteRule ^(.*)$ https://%{HTTP_HOST}$1 [R=301,L]
</VirtualHost>

# Sonar
<VirtualHost *:443>
  ServerAdmin system@mydomain.com
  ServerName sonar.mydomain.com

  RequestHeader set X_FORWARDED_PROTO 'https'

  SSLEngine On

  SSLCertificateFile /opt/local-certs/star.mydomain.com.crt
  SSLCertificateKeyFile /opt/local-certs/star.mydomain.com.key
  SSLCACertificateFile /opt/local-certs/star.mydomain.com.crt-bundle

  ErrorLog ${APACHE_LOG_DIR}/error.log
  CustomLog ${APACHE_LOG_DIR}/access.log combined

  ProxyPass / http://localhost:9000/
  ProxyPassReverse / http://localhost:9000/
</VirtualHost>

# Jenkins
<VirtualHost *:443>
  ServerAdmin system@mydomain.com
  ServerName jenkins.mydomain.com

  RequestHeader set X_FORWARDED_PROTO 'https'

  SSLEngine On

  SSLCertificateFile /opt/local-certs/star.mydomain.com.crt
  SSLCertificateKeyFile /opt/local-certs/star.mydomain.com.key
  SSLCACertificateFile /opt/local-certs/star.mydomain.com.crt-bundle

  ErrorLog ${APACHE_LOG_DIR}/error.log
  CustomLog ${APACHE_LOG_DIR}/access.log combined

  ProxyPass / http://localhost:8080/
  ProxyPassReverse / http://localhost:8080/
</VirtualHost>.
4. Reload the service
4.1 Reload the Apache2 service
$ sudo service apache2 reload
4.2 Check on your browser using the defined URLs. In our example:
https://sonar.mydomain.com
https://jenkins.mydomain.com

