Jenkins Setup
1. Create sonar home
1.1 Create the C:\sonarqube\sonar-home folder
2. Setup global variables
2.1 Open Jenkins in your brower
2.2 Clik on Jenkins > Manage Jenkins > Configure System
2.3 Select Environment variables. Will show current list of variables, that should be empty if it is a new installation
2.4 Click on button Add
2.5 Set name SONAR_USER_HOME and value C:\sonarqube\sonar-home

2.6 Save the changes
3. Install plugins
If this is the first time to use Jenkins, the following steps can change. Following description is done for an existing Jenkins user.
3.1 Browse to you Jenkins installation
3.2 Clik on Jenkins > Manage Jenkins > Manage Plugins
3.3 Click on Available tab and write "gradle" on the input filter at the top
3.4 Select the Gradle plugin and click on button Install without restart
3.5 Repeat previous steps to install Git and Github plugins (those are required for building some dependencies, just like Gradle plugin)
3.6 Repeat previous steps to install any other source control management plugin you require, like TFS plugin
4. Setup the JDK
4.1 Clik on Jenkins > Manage Jenkins > Global Tool Configuration
4.2 Click on button Add JDK
4.3 Click on button Delete Installer in the block added
4.3 Unselect the Install automatically checkbox
4.4 Fill the Name and JAVA_HOME fields
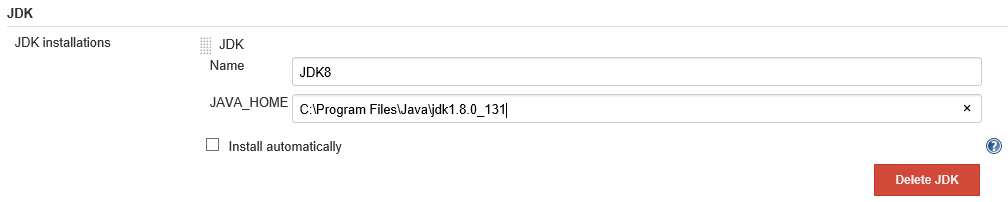
4.5 Save the changes
5. Setup Git plugin
Follow this step only if you are using Git as your source control manager or if you will need to use cachedb-import.
5.1 Find the Git executable path
5.2 Clik on Jenkins > Manage Jenkins > Global Tool Configuration
5.3 Fill the Name and Path to Git executable fields
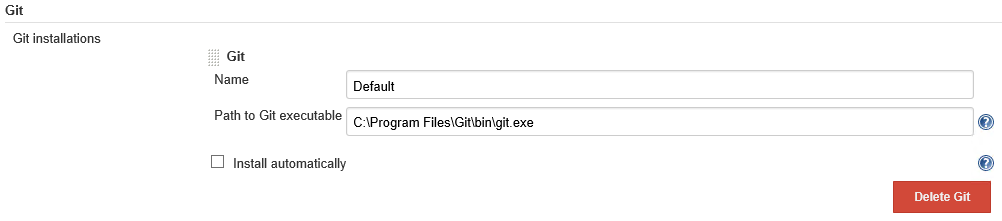
5.4 Save the changes
6. Setup other plugins
Setup any other plugin you need to retrieve your data
1. Create sonar home
1.1 Create the sonar-home folder
$ mkdir /opt/sonarqube/sonar-home
$ chown sonar:tomcat8 /opt/sonarqube/sonar-home
$ chmod 775 /opt/sonarqube/sonar-home
2. Setup global variables
2.1 Open Jenkins on your browser
2.2 Clik on Jenkins > Manage Jenkins > Configure System
2.3 Select Environment variables. Will show current list of variables, that should be empty if it is a new installation
2.4 Click on button Add
2.5 Set name SONAR_USER_HOME and value /opt/sonarqube/sonar-home

2.6 Save the changes
3. Install plugins
If this is the first time to use Jenkins, the following steps can change. Following description is done for an existing Jenkins user.
3.1 Browse to you Jenkins installation
3.2 Clik on Jenkins > Manage Jenkins > Manage Plugins
3.3 Click on Available tab and write "gradle" on the input filter at the top
3.4 Select the Gradle plugin and click on button Install without restart
3.5 Repeat previous steps to install Git and Github plugins (those are required for building some dependencies, just like Gradle plugin)
3.6 Repeat previous steps to install any other source control management plugin you require, like TFS plugin
4. Setup the JDK
4.1 Clik on Jenkins > Manage Jenkins > Global Tool Configuration
4.2 Click on the button Add JDK
4.3 Click on button Delete Installer in the block added
4.4 Unselect the Install automatically checkbox
4.5 Fill the Name and JAVA_HOME fields
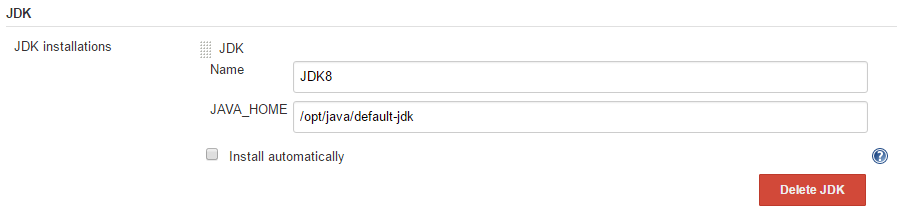
4.6 Save the changes
5. Setup Git plugin
Follow this step only if you are using Git as your source control manager or if you will need to use cachedb-import
5.1 Find the Git executable path
$ whereis git
5.2 Clik on Jenkins > Manage Jenkins > Global Tool Configuration
5.3 Fill the Name and Path to Git executable fields
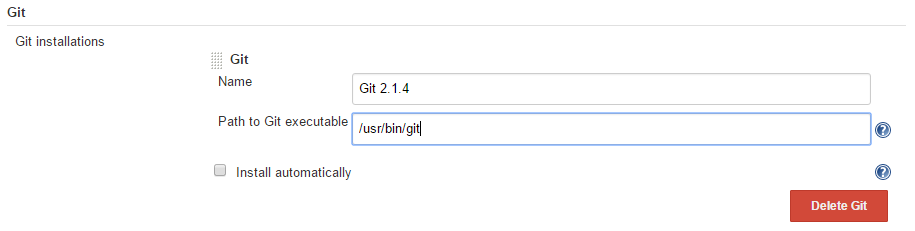
5.4 Save the changes
6. Setup other plugins
Setup any other plugin you need to retrieve your data